2017 AKC Invitational Course Analysis
Invitational 2017 Overview:
The Invitational was held at the Orange Country Convention Center in Orlando, Florida. It's been a wonderful venue and a great place to travel to in the Winter.
 To qualify for the Invitational, you have to be among the top 5 in your breed during the July 1 - June 30 qualifying period. To succeed at the Invitational you need to run 4 clean rounds, finish first in your breed, and be fast enough to be among the 12 chosen to go in your height class to go on to finals. Speed was never our problem. If Braddock ran 4 clean rounds, we would always make it. Consistency had been the issue. The fact that Braddock ran 6 clean rounds is a testament that this was his year.
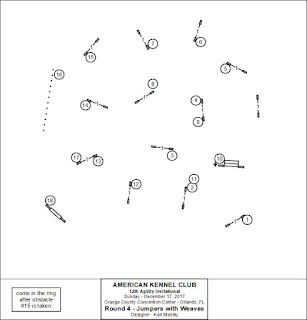
Invitational 2017 Course Analysis:
On Friday, handlers enter T2B if they desire a warm-up prior to the main event. Braddock ran a wonderful course and finished 2nd among 147 24" dogs.
 The first challenge was 3 to 4 (weaves). A few handlers ran on the left side of 1 and 2. But it wasn't a good choice for a big striding dog because that line draws the dog to the Aframe and a likely collision with the handler as the handler tries to push back out to 3 (the line from 2 to 3 is a slight right turn).
The second challenge was the enticing tunnel after 3. However, if dogs took 3 at a slice, they didn't even look at the tunnel. Now, however, is where I had to think about how much of a slice I wanted over jump 3. Too much would not allow him to drift out to get the weaves. Because of the 90 degree angle of jump 3 with respect to my path, I decided that a rear cross before 3 would be too sharp as Braddock turns very efficiently, and thus he would not enter the weaves with as much momentum. And, for a big striding dog, a rear on the flat after jump 3 opens up the tunnel if timing is off. Most handlers, including myself, did a side-change between 2 and 3. I chose a blind cross, but a front cross also worked well.
The third challenge was the turn at #5. A blind cross timed correctly (as the dog commits to 5), made a nice turn for the Aframe. Many handlers chose a front cross, but if you had to babysit the weaves, then the cross was late and dogs went wide.
The fourth challenge was the turn at 11 back to the Aframe. Because handlers could get ahead of their dogs, the front cross here could be timed well and tighten the dog up for the turn.
On Saturday, we started off the event with JWW. Usually I feel that the first course is slightly easy, but this course required a great deal of handling and checking up. Braddock also was high as a kite so when I got to the line I had great concern of whether or not I'd be able to contain him out there.


The Invitational was held at the Orange Country Convention Center in Orlando, Florida. It's been a wonderful venue and a great place to travel to in the Winter.
Invitational 2017 Course Analysis:
On Friday, handlers enter T2B if they desire a warm-up prior to the main event. Braddock ran a wonderful course and finished 2nd among 147 24" dogs.
The second challenge was the enticing tunnel after 3. However, if dogs took 3 at a slice, they didn't even look at the tunnel. Now, however, is where I had to think about how much of a slice I wanted over jump 3. Too much would not allow him to drift out to get the weaves. Because of the 90 degree angle of jump 3 with respect to my path, I decided that a rear cross before 3 would be too sharp as Braddock turns very efficiently, and thus he would not enter the weaves with as much momentum. And, for a big striding dog, a rear on the flat after jump 3 opens up the tunnel if timing is off. Most handlers, including myself, did a side-change between 2 and 3. I chose a blind cross, but a front cross also worked well.
The third challenge was the turn at #5. A blind cross timed correctly (as the dog commits to 5), made a nice turn for the Aframe. Many handlers chose a front cross, but if you had to babysit the weaves, then the cross was late and dogs went wide.
The fourth challenge was the turn at 11 back to the Aframe. Because handlers could get ahead of their dogs, the front cross here could be timed well and tighten the dog up for the turn.
The first handling challenge was to get a nice turn off #2. The best choice was to have the dog on the right. I chose to be closer to #2 as this let Braddock know that he needs to check up before letting loose. Some chose to do a leadout at 2 and run the dog on the left from #3-5, but this led to a wider turn at #2 in my opinion. The choice of how to handle 3-5 was related to the choice for handling 7-8. I chose to rear cross #5, which meant that I couldn't get up to #6 to cue the turn and thus needed to do a turn on the landing side of #7. However, if a handler felt they needed to be at #6 and go into the gap to turn, then it was best to start the course leading out on the landing side of #2.
Now, I preferred the turn on the landing side of #7, and I chose to do a blind cross. The reason I preferred this is because I wanted to be downstream enough to cue a reverse spin on #9 to tighten the turn and have a straight line between 10 and 11. When the dog jumped longer over #9, as many did with the just the pull, the dog took jump 10 more perpendicular to the jump rather than slicing (as Braddock sliced it). Thus, the handler had to push the dog back on the correct line to 11. I felt that not having an efficient line between 10-11 put a lot of pressure on the #10 bar.
Finally, many handlers chose a side change between 15 and 16 because they wanted to cross the tunnel exit before 18. Time after time I saw wide turns off 18. I really felt the better approach was to keep the dog on the right all the way through the tunnel and then set up for a rear cross at 18. When you consider how the dog exits the tunnel. you see how the natural convergence of the dog's exit combined with the handler's motion to 18 sets up nicely for a rear cross at 18.
I was the most pleased with this run out of the 4 qualifying runs. Braddock was the most excited, which made it a thrill, but also, his speed was incredible because his lines were just so efficient.
The second round was a standard course. In past years, the standard courses weren't any issue and among my favorite to run, This year, for some reason, this course was really messing with my head. I was specifically focused on the final line to the tunnel, concerned that convergence would send Braddock off course.
As you can see from the course map, this course was very doable. Most handlers chose a front cross after 3 to get the #4 tunnel. The cross between 5 and 6 was a little tough because: 1) the angle of #5, 2) the spread jump causing dogs to land long and 3) needing to be in position to cue the turn and be off the dog's line to #6. I chose a blind cross after #5, which worked fine, but I came out of the front cross at #3 a little slow and thus my timing at #5 could have been a little sharper. Braddock really had to work that turn. Compare this to the finals. In finals there was a tire to a triple and then a really hard right turn. I did the same blind cross after the triple, but the angle of the triple jump and the timing to cue the turn made his turn off the triple extremely efficient.
At jump 8, I needed a reverse spin because the dogwalk is too enticing for Braddock. I chose to keep him on my right and rear 10 and you can see his nice collection stride over that jump for a tight turn. Now after the dogwalk is where I was losing my head. There was a certain distance I wanted to be from the teeter. I ran a line between the teeter and #14, did a blind cross as he exited the teeter and shaped a slice over 14 as I got as close to 15 as I could (to give me a straight line to the tunnel and not have to converge on 16). I did a reverse spin at 15 to change his line and then sent him straight to the tunnel. I knew the reverse spin at 15 could set a line to the off course #3 jump and he did look at it, but I accelerated out of the spin so he'd stay straight and not turn in to me.
Round 3 was the Hybrid run. There were a couple things to note about this course design. 1) all the handling needed to happen at the #13 panel, and 2) the panel was 4 foot as opposed to 5 foot. This is the section I will discuss the most.
The beginning of the course was fluid. I considered using the "human arrow" at #2 because the line from 2 to 3 was sharper than it looks. However, I went with a blind cross and that worked just fine. I didn't see anyone choosing a rear cross before #4, and my belief is that it wouldn't have been a good idea. With #3 being a double, and the dog jumping pretty much into the handler, I think it was risky for the handler to get in the way. And if the handler held back and waited for the dog to land, well then, you've just cost yourself some time. I did another blind cross between 6 and 7. Then comes the preparation for the tunnel to panel jump. First of all, the correct tunnel entry wasn't a given. If handlers didn't get the head check, handler lines could push the dog into the exit. I ran close to the weaves so that I had room to give some lateral movement, and I still called Braddock's name to ensure the entry. The reason that handlers were a little farther from the weaves is because most everyone chose to serp the panel to the Aframe. This was a hard turn for the dogs over the panel. With a 4' panel, there isn't much room to turn over the jump for the long dogs. Those who did it well had the timing right where they were ahead just enough but not too far (some dogs came through the gap of 13 and 11 as dogs looked at 11 when exiting the tunnel), and handlers had to be enough distance away from the panel to be off the dog's landing point (placing them closer to 17). I was worried that the panel would come down more than it did. Only a few dogs knocked it. However, more came through the gap than what I would have expected. But, because many were having success with this plan, I started to doubt my plan. However this is where knowing your dog comes in to play. I've been in a similar sequence situation before. While past experience wasn't exact, I had concerns Braddock would take 11 if he saw me showing body motion towards that direction (which I would have had to do if I serped the panel). And even if I got him off of #11, then I ran the risk of him coming through the gap. Finally, if I had stopped movement at the panel until I got his head and to prevent him going through the gap, I would have needed to be far enough away from the panel so he could clear the landing (and remember that the panel is an extension obstacle), and I would have run the risk that he would cut behind me and take 17 instead of turning for the Aframe. Instead, I was one of the few who sent from #11 to the tunnel, executed a tunnel brake command, and I turned my shoulders in and picked him up on my right side (holding up my left arm and screaming "with me" to get him off #11). And once I saw that I had his head, I cued the panel and took off for the Aframe. Although Braddock has a wicked fast running contact, there was no risk to being behind as the handler path was to converge on the frame which cued a nice turn at 15. The next handling challenge was to set the line between 16 and 17. Because I was behind, once Braddock took 15 I did a reverse spin from a distance to let him know to turn into me at after 16 to set the line to 17 and then executed a rear cross. The handler also needed to push out of the rear cross quickly because the distance from 17 to the triple was a stride farther apart and many dogs jumped early and took down the triple. So getting dogs to have a little more momentum as they drove that line seemed to help them clear the triple. For those handlers that chose to serp the panel, you could see they were setting themselves up to do a front or blind between 16 and 17.
The last qualifying round was a second JWW. I didn't even look at this course until I got through Hybrid. In the past 2 years this last course had a good deal of challenges, so I wanted to take things one step at a time. To my surprise, when I looked over this fourth round, I thought my eyes were deceiving me. I didn't see any significant challenge.
I ran 1-3 pretty much the same way that had worked in the first JWW round (just opposite and slightly different angles). Once I cued the turn for 2, I set up for a rear cross at 5 (just as in the previous JWW round). Some executed a blind cross between 4 and 5, but honestly most who did that got in their dog's way. Most handlers did a side change between 7 and 8. I chose the blind cross since they had worked well all weekend, and because I could move out of the cross faster to cue the turn at #10. From there, the best path for the dog was to keep them on the left while the handler runs towards the right side of jump #15 showing just enough convergence to cue the turn but not get in the dog's way so that they don't take #15. I think the angle of 14 scared some handlers (or the rear cross to the weaves) so they drove for a cross between 13 and 14. From what I observed, the execution of the cross between 13 and 14 slowed the dog down and was tough to execute well. Note: In finals, I too was scared of a rear cross to the weaves, but that was because there was a jump #8 as a viable off course. But in this run, there was nothing else for the dogs to take except the weaves.
Now, for finals, how one handled that course depended on your goals. One friend of mine wanted to go all out, as fast as you could go. My goal was to place. Thus, I chose simple handling maneuvers, did not over-complicate, and I decided to give my stop command on the dogwalk (which likely cost the ~.5 seconds I needed to win).
The first challenge was the start. A tire, which is extension, and then a triple, which is extension, to a 90 degree right turn to jump 3. As I said previously, I chose the blind cross because my ability to lead out allowed me to cue the turn apporpirately so that Braddock would take the triple already turning to 3. The blind also allowed me to set a line directly for 4 which cued Braddock to slice 3. Then a decel at 4 pulled him in to me (I considered a reverse spin at 4, but I wanted to stay connected for the next part and I also wanted him to round over jump 5 so that he lined up better for the Aframe. Many dogs took the tunnel on the discrimination. I sent to 5 and then paused at 6 just enough to get the headcheck and called his name and then moved towards the frame being only slightly ahead. This part of the course was the hardest for me in terms of getting the timing right. I had to hang back from the frame enough to make sure I had that line before accelerating forward, but still get ahead at the frame so I could cue the line to Jump 8. Some dogs felt convergence and read 8 as a right turn as opposed to the left turn to dogwalk. I ran close to the frame so I could move slight lateral as I approached #8. I did not have to use a direction or easy command. He read the send and the correct turn to the left. The next huge challenge was getting in a blind cross before and after the #12 tunnel. In the big dog class, if the handler couldn't cross before, then they needed to run 13 and 14 with the dog on the left and rear the panel. It worked, and wasn't a bad choice, but when I walked it, there was something about the line I didn't like. So, I pushed for the blind cross before and after #12. This was tricky. As Braddock committed to 10, I needed to start my cross, pause to pick him up on the landing of #11 and move laterally still cuing the tunnel entry as I moved away from it. Otherwise, running forward would land me tripping over the Aframe. Thereafter, the course was rather simple. I chose a front cross after 15. Many chose to cross after the teeter, but I felt this didn't leave handlers the ability to get downstream to cue the turn at 17 well. So why not cross at 15 and then manage the collection at 17. The offcourse #8 caused dogs to drift but didn't really come in to play as an offcourse. Finally, most handlers chose the front cross after the weaves for the finish.


Comments
Post a Comment